
Crispy Garlic Parmesan Crusted Chicken Recipe
When it comes to comfort food, few dishes evoke the same level of satisfaction as crispy garlic Parmesan crusted chicken. This dish stands out not only for its irresistible flavors but also for its textural contrasts that make every bite a delightful experience. With a golden, crunchy exterior that gives way to tender, juicy chicken inside, this recipe is the epitome of culinary comfort.
The appeal of crispy garlic Parmesan crusted chicken lies in its perfect balance of flavors. It’s savory, garlicky, and just the right amount of cheesy, making it a crowd-pleaser at family dinners, casual lunches, or even elegant meal prep for the week ahead. Whether served alongside a fresh salad, mashed potatoes, or roasted vegetables, this chicken dish has the versatility to shine in any setting.
In this article, we will guide you through the process of creating this delectable dish from scratch. You’ll learn about the key ingredients that contribute to its remarkable taste, detailed preparation steps to ensure perfect chicken every time, and effective breading techniques that will result in a crispy finish. Let’s dive into the world of crispy garlic Parmesan crusted chicken and unlock the secrets to mastering this rewarding recipe.
Understanding the Key Ingredients
To create the perfect crispy garlic Parmesan crusted chicken, understanding the key ingredients is essential. Each component plays a crucial role in achieving the dish’s signature flavor and texture.
Chicken Breasts
The star of this recipe is, of course, the chicken. Boneless, skinless chicken breasts are preferred for this dish due to their quick cooking time and ease of handling. They’re versatile and readily absorb flavors, making them ideal for marination. Using boneless and skinless chicken also allows the crispy crust to be the focal point of the dish, ensuring that each bite is packed with texture and flavor without being overshadowed by bones or skin.
Buttermilk
An essential element in this recipe is buttermilk. Marinating the chicken in buttermilk not only tenderizes the meat but also infuses it with a subtle tanginess that enhances the overall flavor profile. The lactic acid in buttermilk breaks down the proteins in the chicken, resulting in a juicy and flavorful piece of meat.
Breading Mixture
The breading mixture is where the magic truly happens, combining several key ingredients to achieve that desired crunch. The base of the breading consists of all-purpose flour, eggs, panko breadcrumbs, and grated Parmesan cheese.
– All-Purpose Flour: This initial layer helps the egg adhere to the chicken, creating a solid base for the crispy coating.
– Eggs: Acting as a binding agent, eggs ensure that the subsequent layers stick to the chicken.
– Panko Breadcrumbs: These Japanese-style breadcrumbs are coarser than regular breadcrumbs and provide a superior crunch, making them a must-have for achieving that crispy texture.
– Parmesan Cheese: Grated Parmesan adds a rich, savory flavor that complements the garlic and herbs perfectly, enhancing the overall appeal of the dish.
Seasonings
To elevate the flavor further, a blend of seasonings is essential. This recipe typically includes garlic powder, onion powder, Italian herbs, and paprika. Each of these ingredients contributes a unique flavor profile that rounds out the dish. Garlic powder and onion powder provide depth, while Italian herbs introduce an aromatic freshness. Paprika adds a subtle smokiness and a hint of color, enhancing the visual appeal of the finished dish.
Preparation Steps for Perfect Chicken
Now that we have a clear understanding of the key ingredients, let’s move on to the preparation steps that will ensure your crispy garlic Parmesan crusted chicken turns out perfectly every time.
Pounding the Chicken
One of the first steps in preparing your chicken is to pound it to an even thickness. This is crucial because unevenly sized pieces can lead to inconsistent cooking, with thinner areas becoming overcooked and dry while thicker parts remain undercooked. Pounding the chicken to about ¾ inch thick ensures that it cooks evenly, resulting in a juicy and tender final product. Use a meat mallet or a rolling pin, and place the chicken between two pieces of plastic wrap or parchment paper to keep the mess to a minimum.
Marination Process
Once the chicken is pounded, it’s time to marinate it in buttermilk. The marination process is simple yet vital. Submerge the chicken breasts in a bowl or a resealable plastic bag filled with buttermilk, ensuring they are fully coated. This step is key to maximizing flavor and tenderness.
Benefits of Marinating in Buttermilk:
– It tenderizes the chicken, resulting in a juicy texture.
– The buttermilk infuses the chicken with a subtle tanginess, enhancing its flavor.
– The acidity of buttermilk helps the breading adhere better during cooking.
For best results, allow the chicken to marinate for at least 1 hour in the refrigerator, although marinating for 4-6 hours or even overnight will yield even better flavor and tenderness. Make sure to keep the chicken refrigerated during this time to prevent any food safety issues.
Setting Up a Breading Station
While the chicken is marinating, prepare your breading station. A well-organized setup will streamline the process and reduce the chances of a mess. You’ll need three shallow dishes:
1. First Dish: Fill this with all-purpose flour seasoned with salt and pepper.
2. Second Dish: Beat a couple of eggs in this dish until well combined.
3. Third Dish: Combine panko breadcrumbs, grated Parmesan cheese, and your chosen seasonings in the final dish. Mix thoroughly to ensure an even distribution of flavors.
Having everything ready to go will make the dredging process quick and efficient, allowing you to focus on achieving that perfect crispy crust.
Breading Techniques for Crispy Crust
Once your chicken has marinated, it’s time to move on to the breading process. This step is crucial for achieving the desired crispy crust that will make your garlic Parmesan chicken truly irresistible.
Dredging Process
1. Coat in Flour: Start by taking a marinated chicken breast and gently shaking off any excess buttermilk. Dredge the chicken in the flour mixture, ensuring it is completely covered. This flour layer will help the egg adhere properly.
2. Dip in Eggs: Next, dip the floured chicken into the beaten eggs, allowing any excess to drip off. This step is essential for allowing the breadcrumbs to stick to the chicken.
3. Coat in Breadcrumbs: Finally, transfer the chicken to the breadcrumb mixture. Press the breadcrumbs onto the chicken to ensure an even coating. This is where the panko and Parmesan will create that coveted crunch. Repeat this process for each piece of chicken.
Tips for Achieving an Even Coating
To ensure an even and thorough coating, consider the following tips:
– Use one hand for wet ingredients (flour and egg) and the other for dry ingredients (breadcrumbs). This prevents your fingers from becoming too sticky and makes the process cleaner.
– Allow the breaded chicken to rest for a few minutes before cooking. This helps the coating adhere better during the cooking process, reducing the risk of it falling off.
– If you want an extra crispy crust, consider double-dipping the chicken. After the first round of breading, dip it back into the egg and then again into the breadcrumbs for a thicker coating.
With these foundational steps covered, you are well on your way to preparing a delicious crispy garlic Parmesan crusted chicken that promises to impress. Stay tuned for the next section, where we will explore the cooking methods to achieve that irresistible crunch and perfectly cooked chicken.
Crispy Garlic Parmesan Crusted Chicken is a dish that delights the senses with its savory flavors and satisfying crunch. This recipe is perfect for family dinners, gatherings, or a cozy night in. In this section, we will explore the significance of the three-step breading method, share cooking instructions for achieving the best results, suggest serving ideas, discuss nutritional information, and conclude with thoughts on the joy of cooking.
The Significance of the Three-Step Breading Method
The three-step breading method is pivotal in achieving the perfect crispy crust. This technique involves three components: flour, egg wash, and seasoned breadcrumbs. Each step serves a specific purpose:
1. Flour: Coating the chicken pieces in flour creates a dry surface that helps the egg adhere better. This initial layer also forms a barrier that locks in moisture during cooking.
2. Egg Wash: The egg wash acts as a glue, allowing the breadcrumbs to stick to the chicken. It enhances the richness of the crust, contributing to its depth of flavor.
3. Breadcrumbs: The final layer of seasoned breadcrumbs provides the crunch that makes this chicken irresistible. Using panko breadcrumbs instead of regular ones can elevate the texture, creating an even crispier result.
By following this method, you ensure that every bite is coated evenly, yielding a golden-brown, flavorful crust.
How to Ensure the Breadcrumbs Adhere Properly
To achieve a perfect adherence of breadcrumbs, follow these tips:
– Pat Dry: Ensure your chicken pieces are patted dry with paper towels before starting the breading process. This removes excess moisture, allowing better adherence.
– Even Coating: Dip the chicken in the flour first, shaking off any excess. Then, coat it in the egg wash, allowing any excess egg to drip off before moving on to the breadcrumbs.
– Press Firmly: After placing the chicken in the breadcrumbs, press down firmly to ensure the breadcrumbs stick well. This creates a thicker, crunchier coating.
– Rest Before Frying: Let the breaded chicken rest on a wire rack for about 10-15 minutes before frying. This allows the coating to set and adhere more effectively.
Cooking Instructions for the Best Results
Choosing the Right Skillet and Oil for Frying
For frying, select a heavy-bottomed skillet or a cast-iron pan, which retains heat well and distributes it evenly. Use a neutral oil with a high smoke point, such as vegetable oil, canola oil, or peanut oil, to achieve a crispy crust without burning.
Ideal Cooking Temperature and How to Test if the Oil is Ready
Heat the oil over medium-high heat until it reaches about 350°F (175°C). To test if the oil is ready, you can drop a small piece of bread or a breadcrumb into the oil. If it sizzles and bubbles immediately, the oil is hot enough for frying.
Importance of Not Overcrowding the Pan
Avoid overcrowding the skillet, as this can lower the oil temperature, resulting in soggy chicken rather than crispy pieces. Fry the chicken in batches, leaving enough space between each piece to allow hot air to circulate. This ensures an even cook and a golden crust.
Cooking Time and Signs of Doneness
Cook the chicken for about 5-7 minutes on each side, depending on the thickness of the pieces. Look for a golden-brown crust and an internal temperature of 165°F (74°C) to ensure the chicken is fully cooked. Use a meat thermometer for accuracy.
Allowing Chicken to Drain Properly After Cooking
Once cooked, remove the chicken from the skillet and place it on a wire rack or a plate lined with paper towels. This will allow excess oil to drain off, keeping the crust crispy and preventing it from becoming greasy.
Serving Suggestions and Pairings
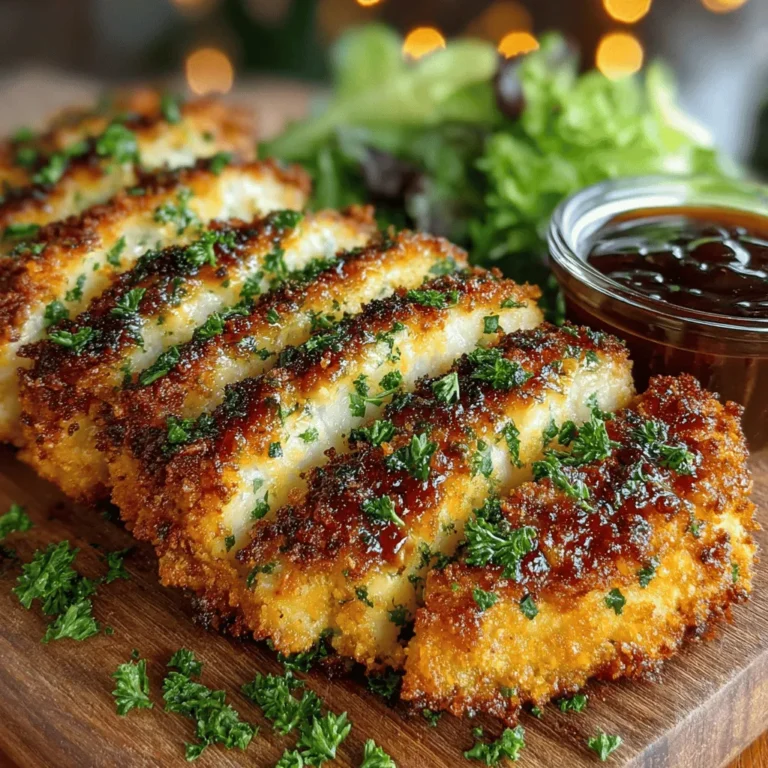
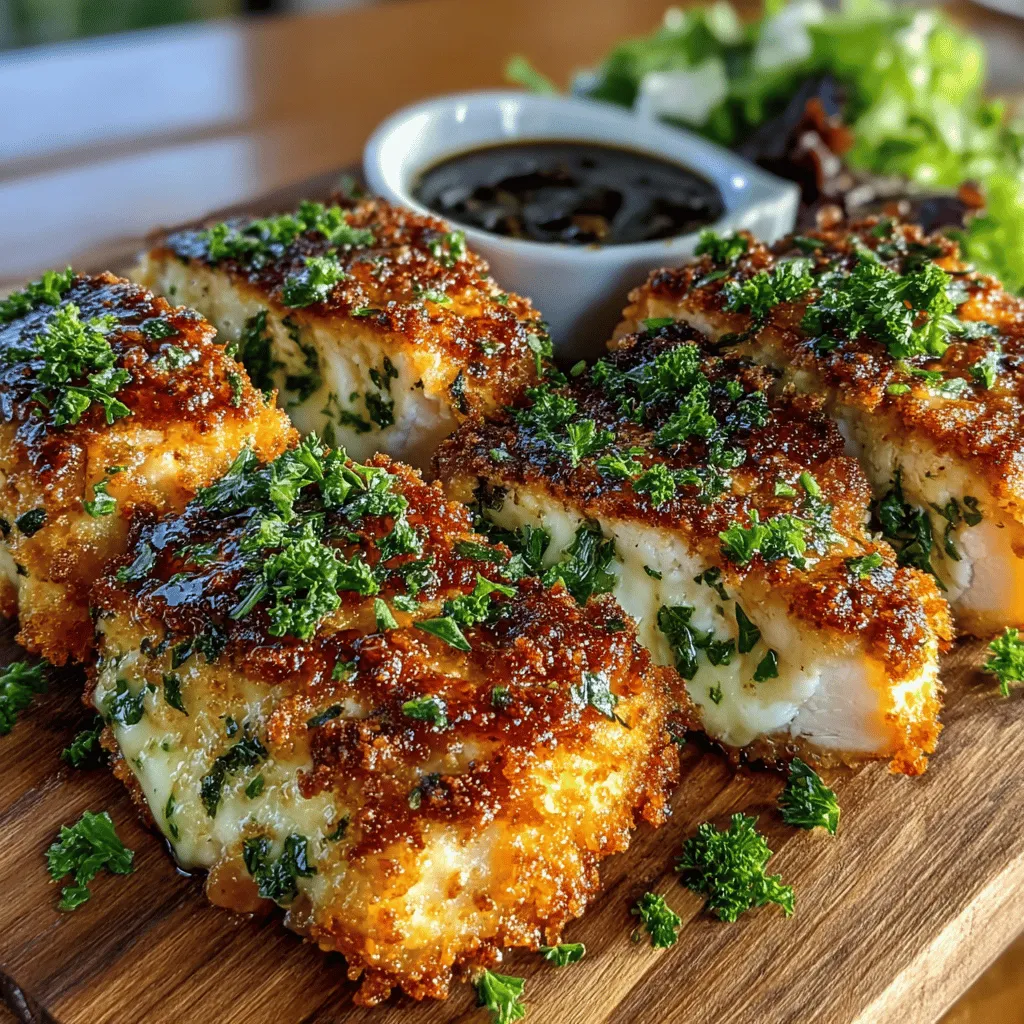
Ideas for Garnishing with Fresh Parsley
For a pop of color and freshness, garnish your crispy garlic parmesan chicken with freshly chopped parsley. This not only enhances the presentation but also adds a hint of herbaceous flavor that complements the dish beautifully.
Recommended Dipping Sauces That Complement the Chicken
Consider serving your chicken with a variety of dipping sauces to elevate the meal further. Some popular choices include:
– Garlic Aioli: A creamy garlic dip that pairs excellently with the flavors of the chicken.
– Sweet Chili Sauce: For those who enjoy a bit of sweetness, this sauce adds a delightful contrast.
– Honey Mustard: The tanginess of mustard combined with the sweetness of honey creates a perfect balance.
Suggested Side Dishes
Pair your crispy chicken with side dishes that enhance the meal. Here are some suggestions:
– Caesar Salad: The crisp romaine lettuce and creamy dressing complement the flavors of the chicken.
– Roasted Vegetables: Seasonal vegetables such as asparagus or Brussels sprouts add a nutritious touch to your plate.
– Quinoa or Rice: Serve with a side of fluffy quinoa or rice to soak up the delicious juices.
Creative Ways to Incorporate Leftovers into Other Meals
If you have leftovers, consider transforming them into new meals. Here are a few ideas:
– Chicken Sandwich: Slice the crispy chicken and serve it on a toasted bun with lettuce, tomato, and a drizzle of your favorite sauce.
– Chicken Salad: Chop the chicken and mix it with greens, cherry tomatoes, avocado, and a light dressing for a quick and satisfying lunch.
– Pasta Dish: Toss the crispy chicken pieces with pasta, olive oil, and fresh vegetables for a hearty dinner.
Nutritional Information
Overview of the Nutritional Profile Per Serving
This crispy garlic parmesan crusted chicken recipe provides a delicious balance of protein and flavor. A typical serving contains approximately:
– Calories: 400
– Protein: 32g
– Fat: 22g
– Carbohydrates: 30g
Discussion on Balancing Indulgence with Healthy Eating
While this dish is indulgent, it can be part of a balanced diet when enjoyed in moderation. Pair it with nutrient-dense sides like salads and vegetables to create a well-rounded meal. Incorporating whole grains alongside the chicken can also enhance the overall nutritional profile.
Potential Substitutions for Dietary Restrictions
If you have dietary restrictions, consider the following substitutions:
– Gluten-Free: Substitute regular flour and breadcrumbs with gluten-free alternatives. Almond flour or gluten-free breadcrumbs work well for the crust.
– Dairy-Free: For a dairy-free option, use nutritional yeast instead of parmesan cheese and replace eggs with a flaxseed meal mixture (1 tablespoon flaxseed meal mixed with 2.5 tablespoons water, let sit for 5 minutes).
Conclusion
Crispy Garlic Parmesan Crusted Chicken is a delectable dish that combines crispy textures with rich flavors, making it a family favorite. The three-step breading method ensures a satisfying crunch, while the suggested dips and sides enhance the overall dining experience. Whether you’re cooking for family or entertaining friends, this recipe is sure to impress.
We encourage you to try this recipe at home, share it with your loved ones, and enjoy the process of cooking delicious meals. Remember, the joy of cooking is not just about the food but also about the memories created around the dining table. Happy cooking!
