
Introduction
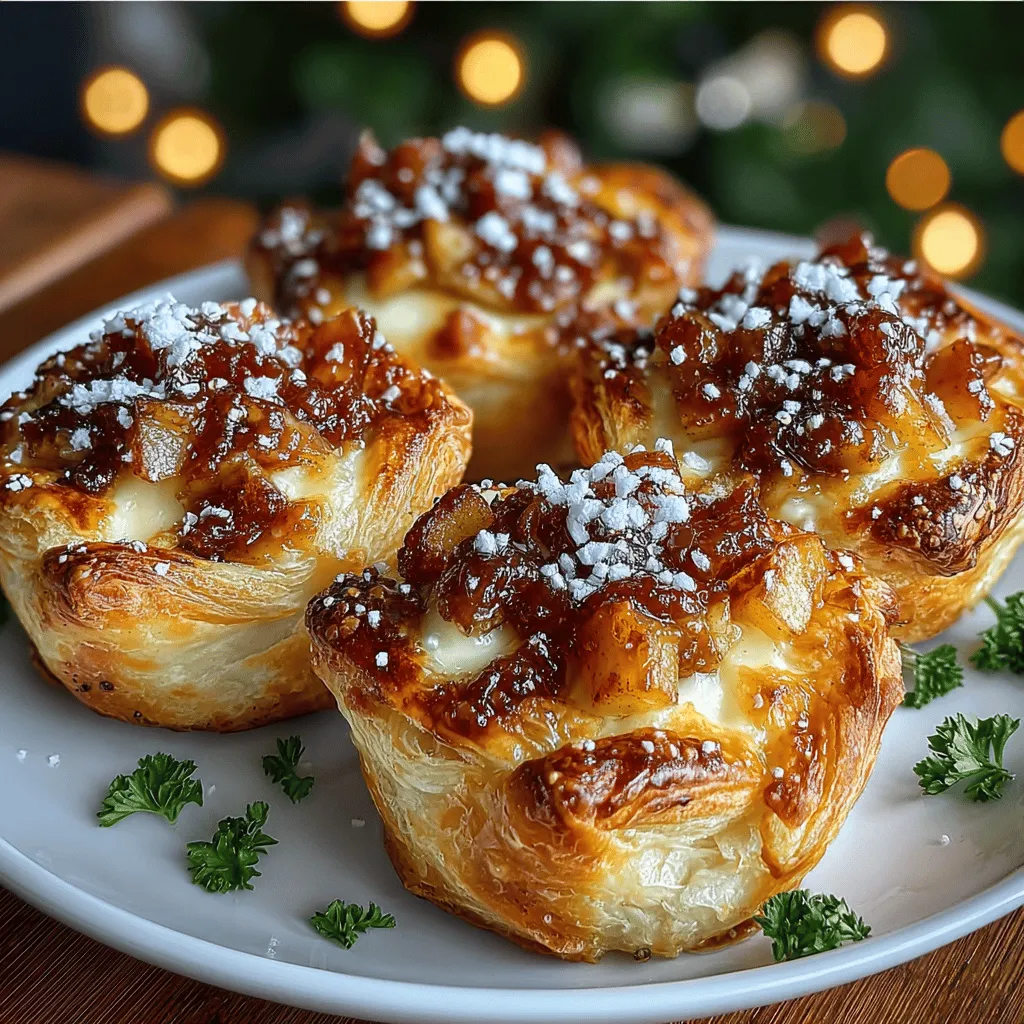
There’s something inherently comforting about homemade pastries that brings a sense of joy to any kitchen. The aroma of fresh dough baking in the oven, combined with the sweet scent of cinnamon and apples, can turn an ordinary morning into a special occasion. Among the many delightful options available, one treat stands out for its perfect blend of flavors and textures: the Apple Cinnamon Cream Cheese Danish. This delectable pastry is not just a breakfast option; it can also serve as a wonderful dessert or a sweet snack throughout the day.
The Apple Cinnamon Cream Cheese Danish beautifully balances the sweetness of fresh apples, the creamy richness of cream cheese, and the warmth of aromatic cinnamon. Each bite offers a delightful contrast between the flaky, buttery layers of dough and the luscious filling, making it an irresistible choice for any pastry lover. Whether enjoyed with a cup of coffee in the morning or as an indulgent afternoon treat, this Danish is sure to please.
Understanding the Danish Pastry Tradition
To fully appreciate the Apple Cinnamon Cream Cheese Danish, it’s essential to understand the origins and significance of Danish pastries. The term “Danish” actually refers to a specific type of pastry that is characterized by its flaky, layered texture, which is achieved through a unique dough-making process. This pastry style has its roots in the 19th century when Austrian bakers introduced the concept of laminated dough to Denmark.
Over time, Danish pastries evolved, incorporating local ingredients and flavors, leading to the creation of various sweet and savory versions. The traditional Danish dough is made by folding butter into a yeast-based dough multiple times, creating thin layers that puff up beautifully during baking. This meticulous layering process is what gives Danish pastries their signature flakiness and lightness, making them a beloved choice in bakeries around the world.
Ingredients Breakdown
Danish Dough
The foundation of any great Danish pastry is its dough. The ingredients used in the Danish dough play a crucial role in achieving the perfect texture and flavor. Here’s a closer look at the essential components:
– All-Purpose Flour: This is the primary ingredient, providing structure. You can also experiment with whole wheat flour for a heartier version.
– Yeast: A key player in the leavening process, yeast helps the dough rise and become airy.
– Butter: High-quality butter is vital for creating the flakiness that Danish pastries are known for. The fat content in butter helps in building the layers.
– Sugar: A small amount of sugar enhances the flavor and contributes to the browning of the pastry.
– Salt: This enhances the overall flavor of the dough, balancing the sweetness.
– Milk: Used in the dough to provide moisture and richness, it also helps in activating the yeast.
Each ingredient has its purpose in creating the perfect Danish dough. If you’re looking to make a healthier version, consider substituting part of the all-purpose flour with whole wheat flour or experimenting with alternative sweeteners.
Cream Cheese Filling
The cream cheese filling is a standout element of the Apple Cinnamon Cream Cheese Danish. This filling provides a rich, creamy texture that complements the other flavors perfectly. Here’s what you need to know about this filling:
– Cream Cheese: The star of the filling, cream cheese adds a smooth, tangy flavor that pairs exceptionally well with sweet ingredients. For a more citrusy twist, consider adding a bit of lemon zest or vanilla extract to enhance the flavor profile.
– Sugar: A bit of sugar sweetens the filling, balancing the tanginess of the cream cheese.
– Egg: Often included in the filling, an egg helps to bind the ingredients and adds richness.
Variations for the cream cheese filling can include the addition of spices like nutmeg or even a swirl of fruit preserves for an extra burst of flavor.
Apple Cinnamon Filling
The use of apples and cinnamon is what truly makes this Danish a treat to savor. When selecting apples for the filling, consider the following:
– Apple Varieties: Tart apples like Granny Smith or sweet options like Honeycrisp work wonderfully. Each variety brings its unique flavor and texture to the filling, allowing you to customize the sweetness and tartness to your liking.
– Cinnamon and Brown Sugar: These ingredients enhance the natural sweetness of the apples and provide warmth and depth to the overall flavor. The combination of cinnamon and brown sugar creates a comforting and inviting aroma as the Danish bakes.
Topping
To finish off the Danish, a simple egg wash can be applied before baking. This step is vital as it gives the pastry its golden-brown color and appetizing sheen. For an added touch of sweetness and crunch, consider sprinkling coarse sugar on top before baking, creating a delightful contrast to the soft filling.
Step-by-Step Instructions
Preparing the Dough
1. Activate the Yeast: Begin by warming your milk to a lukewarm temperature (about 110°F or 43°C). In a small bowl, combine the warm milk with a teaspoon of sugar and the yeast. Allow it to sit for about 5-10 minutes until it becomes frothy. This indicates that the yeast is active and ready to work its magic in your dough.
2. Mix Dry Ingredients: In a large bowl, whisk together the all-purpose flour, remaining sugar, and salt. Make a well in the center of the dry ingredients and pour in the activated yeast mixture along with melted butter. Mix until a rough dough forms.
3. Knead the Dough: Transfer the dough onto a lightly floured surface and knead for about 5-7 minutes until it becomes smooth and elastic. The kneading process is essential for developing the gluten structure, which will help create a fluffy and airy pastry.
4. First Rise: Place the kneaded dough in a greased bowl, cover it with a clean kitchen towel, and allow it to rise in a warm place until it doubles in size, approximately 1-2 hours.
5. Prepare the Butter Block: While the dough is rising, prepare a block of cold butter. Place about 1 cup of cold, unsalted butter between two sheets of parchment paper. Use a rolling pin to flatten it into a rectangle, about 1/2 inch thick. Chill this butter block in the refrigerator while you wait for the dough to rise.
6. Incorporate the Butter: Once the dough has risen, punch it down and roll it out on a floured surface into a large rectangle. Place the chilled butter block in the center of the dough and fold the sides over the butter, encasing it completely. This is the beginning of the lamination process.
7. Laminate the Dough: Roll out the dough with the butter enclosed into a long rectangle, then fold it into thirds like a letter. This first fold is known as a “turn.” Wrap the dough in plastic wrap and refrigerate for at least 30 minutes. Repeat this rolling and folding process two more times, chilling the dough for 30 minutes between each turn. This multi-layering is what gives Danish pastries their flaky texture.
By the end of this preparation, you will have a beautifully layered dough ready for the next steps in creating the Apple Cinnamon Cream Cheese Danish. Stay tuned for the filling assembly and baking instructions that will bring this delightful pastry to life.
Creating an irresistible Apple Cinnamon Cream Cheese Danish at home is not just about following a recipe; it’s about mastering the techniques that will elevate your baking skills. In this guide, we will delve into the detailed steps required to mix and knead your dough, prepare a delicious cream cheese filling, and craft the perfect apple filling. We’ll also cover how to shape and bake your Danish to perfection. Let’s get started!
Mixing and Kneading Techniques for Best Results
The foundation of a great Danish lies in its dough. Here’s how to mix and knead it effectively:
1. Mixing the Dough:
– Start by combining your dry ingredients—flour, sugar, and salt—in a large mixing bowl. Make a well in the center and add your yeast mixture, followed by the milk and melted butter.
– Using a wooden spoon, stir the mixture until a shaggy dough starts to form. This initial mixing is crucial as it allows the yeast to activate and the flour to hydrate.
2. Kneading:
– Turn the dough onto a lightly floured surface. Knead the dough for about 8-10 minutes. You’re looking for a smooth, elastic texture that springs back when you press it with your finger.
– If the dough feels too sticky, sprinkle a little more flour as needed, but be careful not to add too much, which can make the dough dense.
Tips for Ensuring the Dough Rises Effectively
– Warm Environment: Yeast thrives in warmth. Place your dough in a warm, draft-free area, such as an unlit oven or a sunny spot in your kitchen.
– Cover the Dough: Use a clean kitchen towel or plastic wrap to cover the bowl. This traps moisture and creates a humid environment, encouraging the dough to rise.
– Patience: Allow the dough to rise until it doubles in size, which usually takes about 1-2 hours. Don’t rush this process; a well-risen dough leads to flaky, tender pastries.
Crafting the Cream Cheese Filling
A smooth and creamy filling is essential for a delicious Danish. Here’s how to achieve it:
1. Ingredients: Gather your cream cheese, powdered sugar, vanilla extract, and a dash of lemon juice.
2. Mixing: In a mixing bowl, beat the softened cream cheese until smooth. Gradually add powdered sugar and continue to mix until fully incorporated.
3. Achieving Consistency:
– It’s crucial to ensure there are no lumps in your filling. Using a hand mixer can help achieve a velvety texture.
– The addition of lemon juice enhances flavor and balances the sweetness, making your filling irresistibly delicious.
Cooking the Apple Filling
To enhance the flavor of your Danish, sautéing the apples correctly is key:
1. Sautéing Technique:
– Peel, core, and slice your apples into small, even pieces. This ensures they cook uniformly.
– In a skillet, melt butter over medium heat and add the apple slices along with sugar, cinnamon, and a pinch of salt.
– Sauté for about 5-7 minutes until the apples are just tender but still hold their shape. This preserves their texture, providing a delightful contrast to the creamy filling.
2. Cooling the Filling:
– After sautéing, transfer the apple mixture to a bowl and allow it to cool completely before assembling your Danish. Hot filling can cause the dough to become soggy and may lead to an uneven bake.
Shaping the Danish
Shaping your Danish is an artistic process that makes your pastries visually appealing:
1. Rolling the Dough:
– Once your dough has risen, punch it down to release the air. Roll it out on a floured surface into a large rectangle, about 1/4 inch thick.
– Aim for an even thickness to ensure uniform baking.
2. Cutting Techniques:
– Cut the dough into squares or rectangles, depending on your desired shape. A good size to aim for is about 4×4 inches.
– If you want to create a braid or twist, make diagonal cuts on opposite sides of the dough square, creating flaps to fold over the filling.
3. Folding and Sealing:
– Place a spoonful of cream cheese filling in the center of each square, followed by the apple filling.
– Fold the corners of the dough over the filling, pinching them to seal. Ensure the filling is well-contained to avoid leakage during baking.
Baking Process
Baking your Danish to perfection requires attention to detail:
1. Oven Temperature:
– Preheat your oven to 375°F (190°C). A hot oven is crucial for achieving a golden, flaky pastry.
– Consider using a baking stone if you have one; it retains heat and ensures even baking.
2. Baking Time:
– Bake your Danishes for 20-25 minutes, or until they are puffed and golden brown.
– Keep an eye on them as baking times can vary based on your oven.
3. Testing for Doneness:
– Look for a golden-brown color on the tops and bottoms of the pastries. Additionally, if you gently press on the top, it should feel firm rather than soft.
Serving Suggestions
Your Apple Cinnamon Cream Cheese Danish can be enjoyed in various delightful ways:
1. Serving Ideas:
– Serve warm or at room temperature, dusted with powdered sugar for an elegant touch.
– Drizzle with a simple glaze made from powdered sugar and milk for added sweetness.
2. Beverage Pairings:
– This pastry pairs beautifully with a hot cup of coffee or tea. The rich flavors of apple and cinnamon complement a robust brew.
– For a breakfast treat, consider pairing it with a glass of cold milk or a warm chai latte.
3. Presentation Tips:
– Arrange your Danishes on a beautiful platter, garnished with fresh apple slices and a sprinkle of cinnamon for an appealing presentation.
– Consider adding a small bowl of caramel or chocolate sauce for drizzling on the side.
Nutritional Information
Understanding the nutritional aspect of your homemade pastries adds a layer of mindfulness to your enjoyment:
– Calorie Count: Each Apple Cinnamon Cream Cheese Danish contains approximately 300-350 calories, depending on the size and specific ingredients used.
– Nutritional Benefits: Apples provide fiber and vitamins, while cream cheese adds a touch of protein. However, these pastries are indulgent, so moderation is key to enjoying them as part of a balanced diet.
Conclusion
Making Apple Cinnamon Cream Cheese Danish at home is a rewarding experience that goes beyond just baking. It encompasses the joy of working with dough, the satisfaction of crafting a delicious filling, and the pleasure of sharing delectable treats with loved ones. Don’t hesitate to experiment with different flavors and fillings—try adding nuts, raisins, or even a hint of caramel. The kitchen is your playground, and each batch of Danish can be a new adventure. Enjoy the process, and savor the delightful results!